
Thursday, April 28, 2011
Inspiration
Inspiring me today......
 Barn doors are so beautiful in their simplicity, aren't they? My hubby bought an old barn and it's contents at an auction recently. So, what am I going to do with all that wonderful old rustic barn wood? Stay tuned to find out.........
In, in, in...but somehow still a little out...

Dearest readers,
I am, as you will have noticed, a very "secret" blog friend these days,
but I read and appreciate every word and kind comment you leave here
- thank you so much!
And now, without further ado, I invite you into our conservatory, a k a play room for two rather play-driven young family members. On this particular day, the toys had been tidied away in the baskets, but for those of you eager to play a little "Spot the Thunderbird Top"-game, the clue is to "think red"... During the warmer months, we don't spend much time in here, at least not during sunny days when it gets VERY hot, so board games and some other toys can be found nesting in other parts of the house too.
To give the white and rather plastic-looking left wall a little boost of life, I recently made a few eucalyptus wreaths to break up the large expanse of white. I have often thought of putting pictures up to cover some of that wall, but as everything in here tends to get very sun-bleached, I have chosen not to.

As this is a room where armchairs serve a launch pads for -young- human rockets, and generally has to put up with a lot of roughty toughty play, all the arm rests on the chairs now expose "war wounds" and gaping foam. Nothing that a few throws and home-made arm rest covers can't hide... and the room can continue to serve its dual purpose of Young Boys Go Wild Arena and Relax in Late Afternoon for Grown-Ups Refuge. Very often both at once...


***
...and in another part of the house, something changed earlier this year:
A splash of not so splashing colour...

Yes, a few months ago, I finally got my act together and reached for the paint brush.
It was time for a calmer colour scheme in the bath room...


If you would like to see what the bathroom looked like before, look here.
Wishing you a lovely long weekend!
Helena
Friday, April 22, 2011
Out, out, OUT...!

Yes, I want to spend all my waking hours outdoors now,
quietly ignoring the needs and musts of normal life...
How can you stay in, when the sky is so hypnotically blue!?!
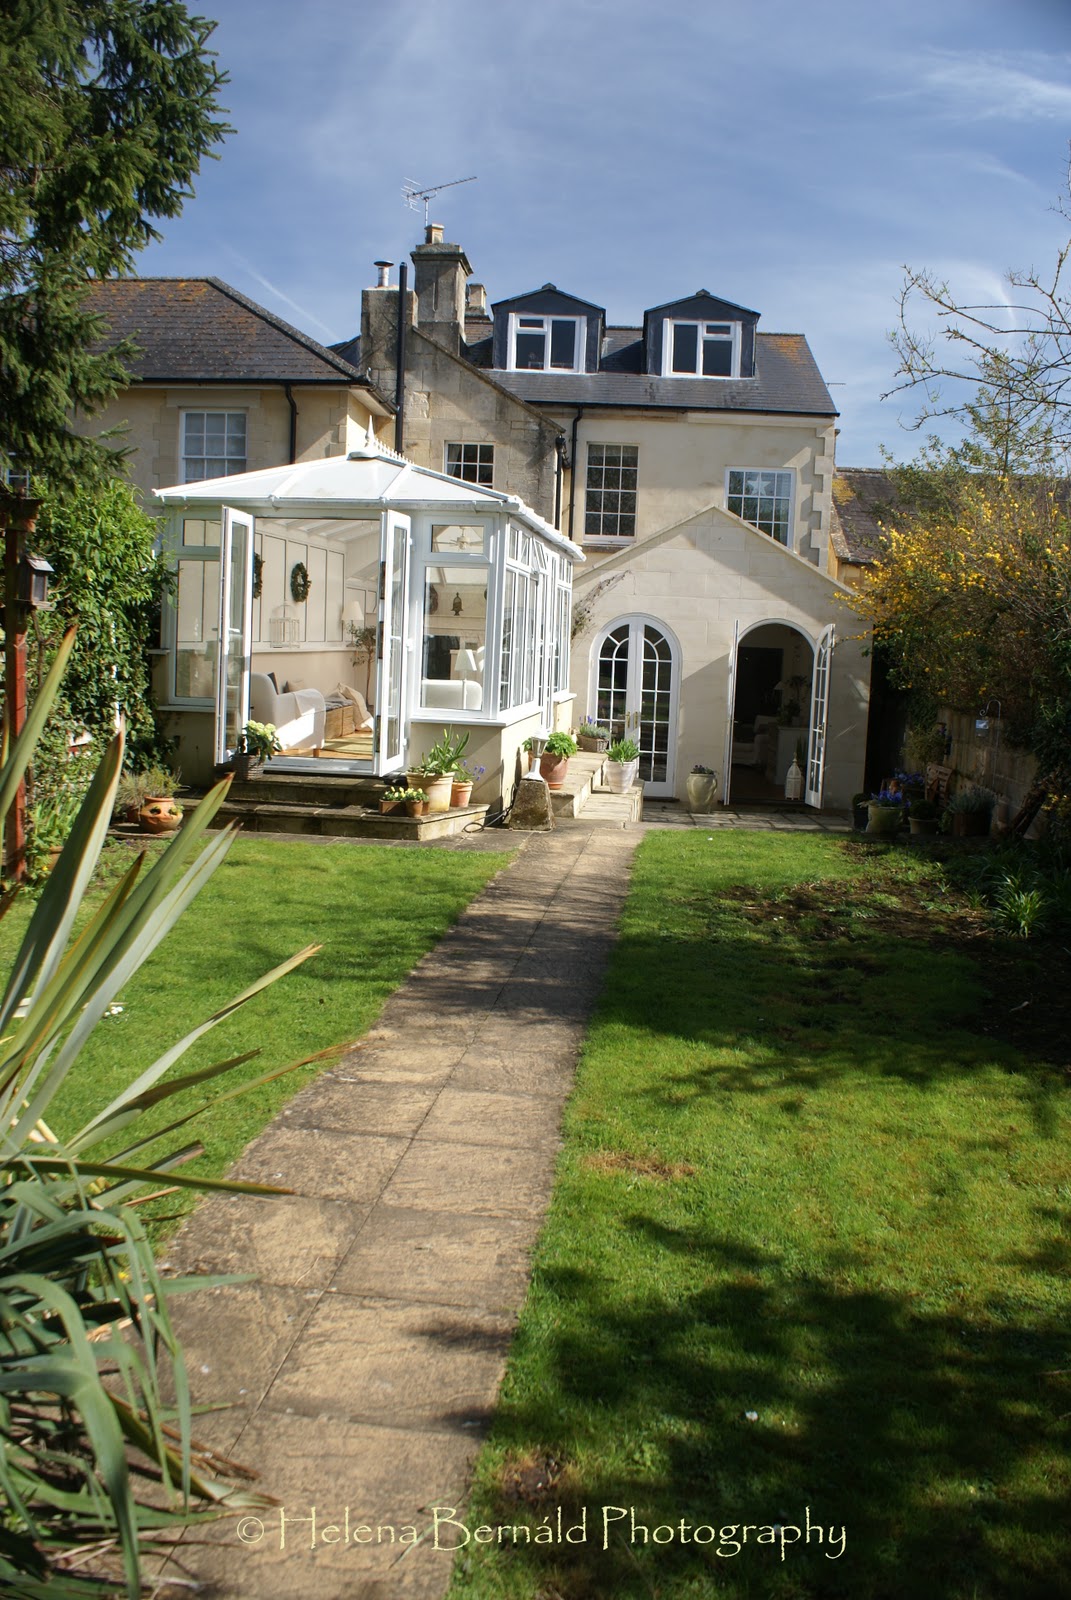
I have not shown the exterior of our house for some time,
so above is a photo of the back of our house,
taken from behind the pond, just behind the scruffy, old fence.

And there we have it, the scruffy, flaking, in-quite-a-sorry-state fence... behind our frog-infested pond. I am amazed the fish have not signed a petition yet to have the loud jumpers evicted, both on account of noise level and spawn extravaganza, but they all seem to live in perfect pond harmony...


Our house is a semi-detached and the window to the very left, just above the conservatory to the left, is part of our neighbours' house. And no, our house is not The Leaning Tower of Pisa, as it appears in the image below. I am afraid blame will here be cast on the photographer... Next on the agenda is to get rid of the "motorway" running down the middle of the garden...
Wishing you all sun, suN and SUN...

...and a lovely Easter weekend!
Helena
Wednesday, April 20, 2011
A Dining Room Redo With Special Meaning

When my dad passed away years ago, he left behind his beautifully built wood projects, one of which was a set of four dining table legs that he skillfully turned himself. He was so proud of the work that he did and I was amazed that he taught himself how to build furniture so I'm learning to do the same thing in his honor.
My family of 5 needed a much bigger dining room table so I decided to build one using the legs that my dad turned before he passed away. A post on the details of building the table, later. I have always wanted a farmhouse table with that charming, worn look created by being passed down from generation to generation, so, I decided to top the table with inexpensive 1 x 8 pine wood planks bought from Lowes. I stained them with a dark walnut stain, coated with polyurethane, lightly sanded, distressed and attached to the top of the apron and legs of the table. I painted the legs and apron a bright cottage white and took a palm sander to them to distress them a bit, as well. It turned out perfect and makes me smile when I see it. And I like to think of it as the table that my dad and I built together.

I like to mix different styles of dining chairs and already had these so I painted them all white to unify the different styles and distressed them to match the table. The fabric I upholstered the seat with is painters drop cloth that I taped off and painted wide stripes on with taupe/gray colored paint I already had called smoked oyster. I added textile medium to it to soften it up a bit but also to create a paint that could be washed, if needed. I wanted the fabric to appear faded with age, so I brushed it on very lightly and left some areas not completely filled in.


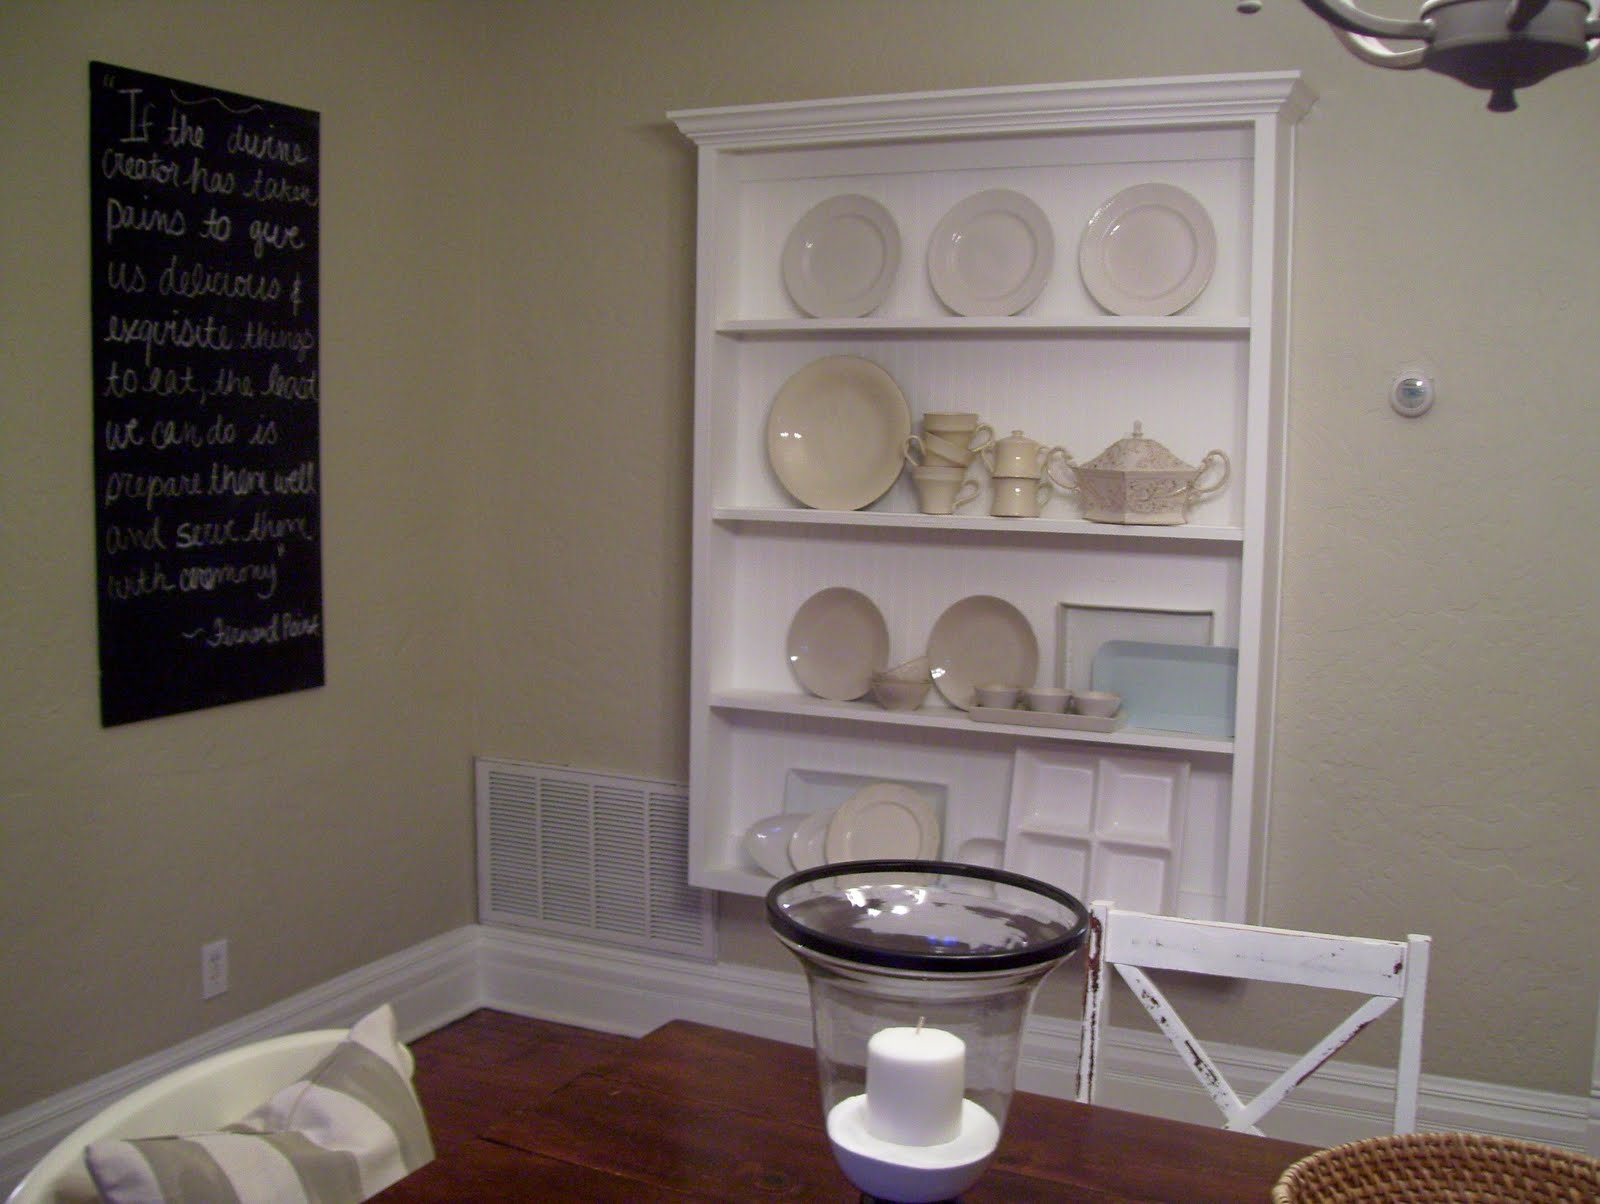
The wall art is just a piece of 1/2 inch thick plywood painted with chalkboard paint in which I wrote a quote by Fernand Point, a french chef.


Tuesday, April 19, 2011
Fun Glasses for Summer

Summer is all about fun and relaxation and what could be more relaxing than enjoying an ice cold drink in these cute little glasses. I came across these today and thought they were so adorable and fun that I just had to share. Bet you'll never guess where I purchased them.....The Dollar Tree! Really! You can find some great things at the place if you look and for a buck each, I wasn't going to pass them by. These will be the perfect fit for a cold glass of iced tea or freshly squeezed lemonade this summer! I just love a bargain!
Saturday, April 16, 2011
Asparagus Gruyere Tart

A favorite vegetable around our home is asparagus. I

Friday, April 15, 2011
Vanilla Bean Cupcakes

Who doesn't love cupcakes? My kids absolutely adore them. A few weeks ago, I came across these cute little ceramic cupcake pedastals. Aren't they lovely? I think so and just had to have them. For me, part of the fun of baking, besides the happy faces of my family and friends, is a special dish to serve it on. You can order a set by clicking here.
My kids are huge fans of vanilla, so I made vanilla cupcakes, of course, but I made them a little extra special by adding vanilla bean. I have a jar stocked full of them for times such as these and like to add them to all kinds of baked goods. Here's a tip, order your vanilla beans on Ebay. They have some wonderful vanilla bean sources there, you get them in bulk and it is so much cheaper than the two you get for around ten bucks at the grocery store. When you are finished scraping the seeds from the vanilla bean, store the pods in your canister of sugar and after a few days, you will have vanilla sugar to use in all your baked goods.
These cupcakes were disappearing while I was trying to take photos of them. They are so wonderful and creamy and don't you just love the little stand?! Such a fun, stylish way to enjoy a delicious treat! Enjoy!

Vanilla Bean Cupcakes
1 1/2 cups self rising flour
1 1/4 cups all purpose flour
2 sticks unsalted butter, softened
2 cups vanilla sugar (or 2 cups regular sugar and 1 vanilla bean)
4 large eggs, at room temperature
1 cup milk
1 tsp vanilla
Preheat oven to 350 degrees and line two 12-cup muffin tins with cupcake papers. In a small bowl, combine the flours and set aside.
In a large bowl, cream the butter until smooth. Add the sugar, and pulp of vanilla bean if using, gradually and beat until fluffy, about 3 minutes. Add the eggs, one at a time, beating well after each addition. Add the dry ingredients in three parts, alternating with the milk and vanilla. With each addition, beat until the ingredients are incorporated, but do not overbeat. Using a rubber spatula, scrape down the batter in the bowl to make sure the ingredients are well blended. Carefully spoon the batter into the cupcake liners, filling them about three-quarters full. Bake for 20-25 minutes, or until a toothpick inserted in the center comes out clean. After cupcakes have cooled, frost with vanilla bean buttercream frosting.
Vanilla Bean Buttercream Frosting
2 sticks unsalted butter, softened
6-8 cups powdered sugar
1/4 cup milk
1 tsp vanilla
pulp from 1 vanilla bean
Cream the butter in a large mixing bowl. Add 4 cups of the sugar, milk, vanilla and pulp from the vanilla bean*. Beat until smooth and creamy, about 3-5 minutes. Gradually add remaining sugar, 1 cup at a time, beating well after each addition (about 2 minutes), until the icing is thick enough to be of good spreading consistency. You may not need all the sugar. Icing can be stored at room temperature in an airtight container for up to three days.
*Note: to get the pulp from a vanilla bean pod, slice it down the middle with a paring knife, open it and using the blade of the knife, scrape down the inside of the pod, from top to bottom, gathering up all that wonderful pulp. Don't discard the pod, stick it in your sugar canister and it will turn your regular sugar into something special.
Wednesday, April 13, 2011
Front and Side Porch Redo
I happen to love decorating based on the season and our favorite seasons around here are, without a doubt, spring and summer. So, it was definitely time to give the front and side porches a makeover because of all the outdoor living we enjoy in the summer months. And after uncooperative weather, jumping off the porch, missing and ending up on crutches, it's finally finished! Let's take a look.....

Ahhhh, color! I love it when the earth starts waking up again.

Here is our favorite corner of the porch. There is nothing like relaxing on the porch swing with the people I love. I ordered all the fabrics for the pillows here and made them myself. Notice my fun thift store table here in front of the porch swing. Love it!
Another view...lots of shadows here, it was very sunny!

I scraped the old paint off the porch and repainted with an oil based porch paint called Brownstone, purchased at Lowe's. It looked like a can of melted chocolate and was very distracting, yum! I love the glossy shine it gives the porch. I also thought it would contrast nicely with the lighter colors of the house and shutters, which I also repainted a creamy white.


I made the "beach" sign with weathered wood my hubby found in an old barn and light aqua paint I already had. The old oars were also found by hubby in the same barn and the hanging mason jar candle holders were purchased at Pottery Barn last summer. I love the beachy, comfy feel it all gives the front porch.

Moving on to other side of the porch....After seeing these numbered pillows in a Pottery Barn catalog, I decided to make them myself by printing the numbers off the computer, creating a stencil with freezer paper and painting the numbers on the fabric. Fun and free! I adore these pillows! You just can't have too many of them when cuddling up with your hubby or kiddos on a relaxing spring or summer evening.
Next up, the side porch.....looking at this porch makes me so happy!


The floor was the same boring color as the front porch so I scraped, sanded and removed most of the paint. I wanted to do something fun here so I decided on stripes. What is more fun than that?! First, I painted the entire porch with plain white porch paint purchased at Lowes. Then, after it completely dried, marked off three planks at a time with painter's tape and painted each alternating group of planks with Benjamin Moore Manchester Tan that I already had. To protect it, I put several coats of non-yellowing floor polyurethane. We love it! Something fun and unexpected for a porch!

I've always wanted porch curtains, to add a touch of romance and breeziness to a porch, so, I finally decided to go for it and make a pair. I purchased my usual inexpensive fabric, painter's canvas drop cloth at Lowe's, and sewed a couple of panels, inserted jute rope through the rod pocket and hung on the inside of the porch and tied back with more jute rope. Just a little something special for the corner of the porch. The glider was another found object by my hubby that looked like this when he brought it home

And after some heavy duty sanding with steel wool and a few coats of this...

...it was as good as new, maybe even better. :)

Working on both of these porches has been a lot of fun and the best part was that I hardly spent any money doing it! I think they both turned out lovely and all the hard work has made spending time on the porch with my family much more cozy and comfortable. I hope you enjoy looking at the photos as much I enjoyed making over the space! Thanks for looking, have a wonderful day!
A Little Bar Stool Makeover!
My hubby is terrific at finding things that have great potential and bringing them home to me to turn into something special. It always excites me when he walks in the door and asks me to come take a look at the treasures he's brought home. A few days ago, he came home with these two barstools that he found on the side of the road.
 Now, I was jumping for joy over this because I had been trying to find the perfect barstool for our rustic center table/island in the kitchen for quite some time but didn't want to spend much money. They were in great condition with only a little rust and faded seat covers so I got busy with a little steel wool and went to work, removing all the rust from the legs of the stools. I couldn't decide what I wanted to do with the seat and back of the stool but after sitting and staring at them for a good while, it came to me.....faux vintage grain sack slipcover!

After I finished sanding off the rust with the steel wool, I gave the stools a good bath and removed the backs. I picked up a package of my favorite "go to" fabric for pretty much everything, painter's canvas drop cloth at Lowe's. I measured, pieced and pinned my fabric together for the slipcover and sewed together.
To achieve the stripes on the slipcover, I simply taped off my fabric by placing 1/4 inch quilters tape, or masking tape will work just fine, to the area and using a cotton ball, lightly applied barn red fabric paint to the taped area. I lightly applied the paint because I wanted it to appear faded or aged like real vintage grain sack cloth. Then I just lifted the tape and voila, perfect stripes. I really do need to remember to take photos of the process.
Anyway, for the number stencil, I chose the font Weltron Urban from the Word program on my computer, typed No. 5 and No. 3 (my two favorite numbers), enlarged it to 150 and printed it out. I then taped the printout to the dull side of a piece of regular ol' freezer paper from the grocery store and cut both out to create a stencil. Discard the printout when finished cutting.
Next, I placed the freezer paper stencil, shiny side down, where I wanted it on the fabric and ironed it on. Then taking black fabric paint, I dabbed it on the area with a cotton ball, very lightly, and then removed the freezer paper. And there you have it. I am in love with these stools and best thing, they were free! Gotta love that!

Summertime...

... and the living is eeeeaaasy...
Dear readers, a HUGE thank you for all your lovely comments
on my previous post. As I am currently away from home,
with only limited time at the computer, I am - still - rather
invisible on your blogs, but very grateful and humble that
you still take the time to stop by mine.
These photos are from last week's "heat wave" in the UK,
when even the most frozen of souls must
have been humming a merry tune...
The inviting sound of flip-flops
echoing down the street, T-shirt-less torsos
flexing their wintery paleness...
(perhaps not as inviting a vision...)
Time for some Swedish cinnamon rolls in the sun!

I simply cannot get enough of pansies and violets this year!
Charity shop bargain cup and tea pot seem to enjoy hosting these sweet little purple ladies.

Some readers might wonder if I live in some sort of over-styled universe all the time,
as more and more of my blog posts seem to show what may appear to some a very staged setting.
The answer is no, of course not.
Nor do I spend all my waking hours creating little still lifes
and arranging pansies to look their cutest.
However, as my work is freelance and I am fortunate enough to work a lot from home,
I can use my lunch break to potter about in the garden,
unleashing my creativity for a moment,
while my brain is processing whatever work task is on the agenda.
I am no painter, nor can I draw very well.
Many are the art forms that I do not master, not even a little, not at all.
However, I do believe we all have some artistic veins inside us that are begging to be nurtured,
and I really believe that in order to stay healthy, we need to explore that creativity,
find whatever artistic expression that carries our voice,
and allow for some playful experimenting.
With so many people living in poverty around the world
and with natural disasters and illness forcing them to focus all their attention on survival,
it may sound a little arrogant to talk about
"the need to explore our artistic voices to stay healthy".
The basic needs of survival are of course an obvious priority,
but if we are lucky enough to live in a safe place,
we may allow ourselves to explore our creativity,
to create beauty around us,
in whatever shape we see it.
For me, right now,
playing around with colours and materials,
flowers and small creative projects,
is both inspiring and therapeutic,
calming and energizing.
To me, decorating is a moment's meditation...


At the end of this very long blog post,
my warmest regards to you all!
Helena

(Home-made cake stand from earlier this year.
Twigs tied with jute string around a tall glass vase,
to serve as a nature-inspired pot for an ivy (on the table).)
Subscribe to:
Comments (Atom)