Monday, June 27, 2011

In my home town...


Dearest blog readers,


With very little to blog about on the home front...


... I took a stroll around my little home town the other day...


... and for a Swede missing her beloved Swedish tradition of the Midsummer festivities last week...


... these views offered a small consolation...


... for the absence of silly songs and jumping like frogs around a phallic pole...

... but only just...!

Again, thank you new readers and old, for stopping by my Swenglish blog world. Thank you SO much for leaving kind words, both fellow bloggers and anonymous readers - your words are precious, even if I am still a very "silent" blog friend on your blogs.

By the way, should you be a potential buyer for one of the cottages in our neighbour village Biddestone (that I showed here the other day), you can check them out on www.rightmove.co.uk, Biddestone. (The one by the pond seems to have been taken off the market, though.) Should you on the other hand feel like a slightly larger property and happen to have £ 3,500,000 floating around in your pocket, another house has just come on the market in the same village, which could relieve you of the burden of that petty cash...

I hope you are enjoying a lovely summer, wherever you are!

Helena

Living Room Ideas and a New Desk

My husband came home with a gorgeous chair a couple of months ago that sparked a desire in me to build a writing desk to accessorize it.  Knowing I was going to put that desk in our living room, rather than our den, I decided to give the whole space a redo. 
First, the desk.......I used table legs that I salvaged from an old table, so, no cost for those.  The top is constructed of four 1 x 6 planks that were 4 feet long.  I used inexpensive pine from Lowe's in the lower grade section.  This is good wood, you just have to look through it and make sure you don't get warped boards.  It has more knot holes than the more expensive pine, but if you are going to paint it, that isn't a concern.  The entire desk cost me just under $30 to build.  A very similar version of this desk sells at Pottery Barn for $600!!  I don't know about you but that's a little out of our budget.  :)

To build the desk, I followed the same plan as my rustic kitchen table.  However, since I wasn't going for a rustic style with the desk and instead, a more polished look, I attached the apron (sides) to the inside of the legs at the joint (instead of the outside) using L brackets, as shown in the photo below, very similar to how I built my dining room table.
For extra stability and sturdiness, I also inserted 2 large screws down through the top of the table into the top of each leg, pre-drilling the holes first.  Since this would be a painted desk, I sunk the screws, filled with spackle and sanded the entire piece, after completely dry, for softer edges.  This is how the table looked before I painted it. 
The table legs were previously stained a dark walnut, so before I painted them white, I primed them with spray primer so I wouldn't need so many coats of white paint.  I painted the entire piece with Valspar ultra white paint.  It was a pretty easy desk to build and we are so excited with the results!
It fits perfectly into the corner I visualized it in, and I love how it pairs with the vintage chair.  This bookshelf was previously black and I didn't care for it.  It made the corner feel like a big black hole.  I primed and painted it with Valspar ultra white and now it really makes our favorite books stand out, I love that, and a room full of books is a cozy one.  And the large basket I picked up at a yard sale for 3 bucks crowns the top perfectly.
The accessories on the desk came from my wonderful hubby from one of his "picking" trips.  The antique wood box is very old and a great place for note cards and stationary.  The envelope holder holds, well, envelopes and some of my vintage post cards from 1905.  The little blue green bowl is perfect for snacks.  Most of the other things in the room I already had.  The wood crate also came from hubby.  They are great for storage.
The curtains and pillows I made from canvas dropcloth.  I stenciled the G on the pillows by combining black craft paint with textile medium to create a washable paint that is also soft and doesn't harden your fabric.  The center pillow I made from an authentic burlap coffee sack that I ordered after Carla at Hammers and High Heels mentioned a great place to buy them in this post.  Thanks Carla!
About this coffee table......it used to be a dining room table!!  I picked it up at a garage sale but it was too small for us to use as a dining table, so, I cut the legs off so that we could use it as a coffee table instead.  Perfect, huh!  The set of hand carved oars were another picked item from hubby.  I like the element of fun and energy they add to the room.
Here's the other side of the room and the wall art I made for hubby for Father's Day.  What do ya think?
I am loving the retro surfboard console table so much that I didn't want to put anything on it, other than this fan cause I didn't want to cover it up.  It's so fun!
I'm so excited to finally have a desk to write and blog at instead of the dining room table.  Thanks for stopping by today!  And thank you for your kind comments, I truly do appreciate every one of them.  Have a great day!

P.S.  If anyone is wondering......the paint on the walls is Manchester Tan by Benjamin Moore. Also, linking up with The Lettered Cottage today! Come join the fun!
The Lettered Cottage

Friday, June 24, 2011

Vintage Chair

Hi!  Just a quick post to show you the cool chair my hubby bought for me that has had me busy building a writing desk to accessorize it....lol!  Nothing fancy, just a simple, pretty place to sit and write or blog that I'm constructing out of wood that we already had.  I just love this chair......
Everything about it is gorgeous.......
The caned seat is probably my favorite part.  It's a great detail.  Love it......
I also love the three spindles/stretchers joining each leg on the three sides underneath.  Usually there are just one or two, but three is eye catching.
And the carved detail work on the back is lovely.  Plus, it is in fantastic shape!
It's just a beautiful chair!  Has anyone seen one before?  Can't wait to put it with it's new desk and post pics.....

Hope everyone has a great weekend!

Tuesday, June 21, 2011

Console Table Redo

Hey there!  Over the weekend, my hubby and I were on our way to a movie with our youngest when we came across a yard sale.  A yard sale in the evening?  Yes!  He told me he had driven past it earlier and noticed a solid wood console table for only 7 bucks that I would probably like to redo, so, we stopped.   Here's the table....I was instantly drawn to the shape of it.
We also picked up this HUGE basket for $3.  I love everything about it.  It. Is. Gorgeous.
To spiff it up, I sprayed it with a shiny coat of polyurethane and that's it. 

Here's what I did with the console table after staring at it for a while.  This may sound a little crazy, but, the top reminded me of a surfboard, sorta, and it also had a retro vibe going on.  So, I decided to have some fun with it.  :)

After sanding it down, I gave it two coats of a really pretty, very light aqua paint color called Icy Teal by Glidden.  Then, since it reminded me of a surfboard, I taped off a 6 inch wide section down the middle and painted that white, then stenciled the number 5 in the center of the white stripe with the aqua color.  No reason for that, really, other than I like the number 5 and I thought that would go with the theme of the table.  After everything was dried, I sanded it down quite a bit so that it would look very distressed, you know, like a retro surfboard!  LOL.....  We love it!
What do ya think?  Fun, huh?  I loved the original drawer pull that was there so I kept it, spray painted it white and roughed it up with sandpaper.
It's something fun and cheerful, and an unexpected surprise, behind the couch in our somewhat coastal inspired living room.  I just finished painting our book shelves white and wow, does it make all our favorite books stand out nicely.  I'm also building a simple writing desk to pair with a beautiful wood chair that my hubby bought for me to add to the room.  The basket we picked up will also be making it's home in there, so, check back soon for pics!  Have a great day!  Linking up with Thrifty Decor Chick today!  Come join the Goodwill Before and After party!

Monday, June 20, 2011

Between the showers...


Having spent the morning clearing out the car after yesterday's car boot sale, taking what I did not manage to sell down to the charity shop, I felt it was time to relax in the garden for a few minutes. Sticking with the recycling theme from yesterday's and this morning's activities, I used some of my bargain finds from a "brocante" in Bath a few weeks ago. The French-inspired vintage market only had seven (!) stalls, most of which were a non-starter for my wallet, but one splendid gentleman clearly wanted to get rid of his things, and offered "oh-my-word-that-is-so-cheap-I-can't-resist" items that not only boasted a tastefully modest price tag, but also had - in my eyes - a certain "je ne sais quoi"...

From the French 'brocante': the two hanging lanterns and the old jelly mould (here acting as fruit basket).


The tray is an old peach crate, and I love how both its age and the tre-digit company phone number have been stamped into the wood, almost "engraved", on the side. The green linen fabric is an old curtain that used to hang in my kitchen in Sweden, and the belt was rejected by the man in the house when they came with his new trousers. A little too new and smart-looking for my taste perhaps, but I thought I would try an idea I had got from Susanne with the wonderful blog "Me and Alice". She used what looks like a softer,well-worn leather belt on a cushion in a neutral colour, and I think that works better than my efforts here. But how boring life would be if I did not experiment a little...?


As I am writing this, it is raining again. Like it did last night... and the day before... and supposedly tomorrow...and for days to come. The old Swedish saying "It is good for the potatoes" seems a little tired and over-used now, and I long for my bad hair days and pale face days to be replaced by sun-caressed, soul-warming summer days. Come on, clouds, surely you have better things to do than hover here?


Oh, dear. A not so bloggable part of our garden, in full view here. The lawn in bad need of a little TLC (= Tender Love and Care), the fence which is no longer so "charming" in its shabby raggedness, the cable running along it to provide electricity for the workshop further down the garden. Ah, well, there you have it. A little dose of Swenglish reality.

Wishing you sun-caressed days, wherever you are!
Thank you for visiting my blog and for all your kind comments - I appreciate every word.
Helena

Father's Day Gift - Inspiration from 1951

There are so many qualities about my husband that I admire.  He is a wonderful, dedicated dad to our kids and would do anything for each of them.  He is thoughtful, supportive and he is, without a doubt, the most selfless person I know. 

I really wanted to give him the perfect gift for Father's Day.  A gift inspired by something he loves.  He is a HUGE baseball fan and loves to collect memorabilia.  A few of his favorite things; vintage baseball programs and concession menus from the past.

When I came across this wall art over at TLC a few weeks ago, to me, it was so reminiscent of a concession menu in the look and shape.  So, I decided to create my own version using this 1951 vintage baseball program that my hubby loves.
via
I think the Visalia baseball team was mentioned in the movie Bull Durham, which also happens to be one of our favorite summer baseball movies.  Not sure if they were talking about this one or not but I thought it was pretty cool anyway. :)
I followed Kevin and Layla's easy how to for the frame.  Then for the words, I used an old stencil that came from a box hubby bought at a yard sale that contained all kinds of vintage stencils, numbers and vinyl decals.  So cool!  Here's how it looks.....
He loves it so much!  And he was really excited that I displayed some of his collections on the ledge with it.  His reaction made me so happy.  I'm loving this, not only because it made him so happy, but because when I look at it, I'm reminded of all the years he coached our two oldest boys in baseball and all those summer afternoons and evenings of playing catch in the backyard, while I watched out the kitchen window as I did the dishes, smiling at how much fun they were having. 
This white storage chest was built for me by my dad.  It's one of my favorite pieces around our home and I thought it would go perfectly.  I made a cushion for it out of painters dropcloth so that it could double as extra seating in this room.
There is nothing better than a project with a special meaning behind it.  Hope all the amazing dads out there had a fantastic Father's Day doing what you love!

Coming up........hubby brought home a very cool chair that has inspired a neat building project.....stay tuned!  Have a great day all and thanks for stopping by!

Friday, June 17, 2011

Blueberry Crisp with Homemade Vanilla Bean Ice Cream

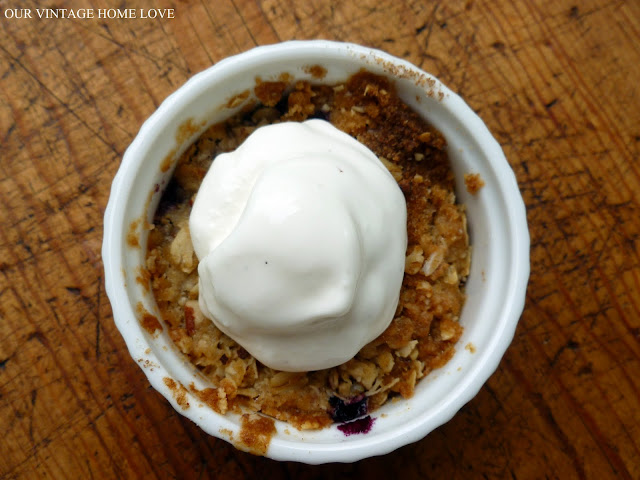
Hey there!  This is another one of our favorite uses for blueberries.....Blueberry Crisp.  But, to make it extra special for your dad or hubby, bake them in individual ramekins and put a dollop of homemade vanilla ice cream on the top of it.  When the creamy, decadent ice cream melts into the warm, buttery crust on top of the sweet blueberries, it is pure heaven! 

For this recipe you will need 6 ramekins and an electric ice cream maker.  Click here to see the kind of ice cream maker I use.  For 40 bucks, it will pay for itself in a month or so if you buy a lot of ice cream for your family and I really like to make my own so I have more control over the ingredients.  It's simple to use and is ready in half an hour.

To make the ice cream, combine the following ingredients in a bowl:
1 cup whole milk
3/4 cup vanilla sugar (or regular sugar)
2 cups heavy cream
1 tsp pure vanilla extract
Pulp from 1 vanilla bean
Mix with a hand mixer for about 3 minutes on low until sugar is dissolved.
Pour into the bowl of the ice cream maker and follow manufacturers instructions.
You will have homemade delicious ice cream in about half an hour, sometimes sooner!
See!  Look at that thick creamy ice cream and the little flecks of vanilla bean!  So fun!  And so good!  To save time, you could make the ice cream the day before you make the blueberry crisp.  That's what I usually do so that I don't have to rush around making several things at once.

I store mine in those glass refrigerator containers you can buy anywhere and pop it in the freezer, usually we eat it up right away, though.  :)

For the crisp, grab a bowl and add:
2 cups of blueberries (fresh or frozen)
1/3 cup of flour
1/2 cup sugar (sometimes less, sometimes more, depends on the sweetness of your blueberries)
1/4 tsp cinnamon
Cinnamon and blueberries together.......so good.
Combine everything and set aside while you make the topping.  It will look like this.
For the crisp, get your food processor, or a bowl and a fork, if you don't have a food processor.  And preheat your oven to 400 degrees.
1/2 cup flour
1/2 cup old fashioned oats
1/2 cup light brown sugar
1 stick cold butter chopped into pieces
1/4 cup chopped pecans
1/4 tsp salt
Put these ingredients into the bowl of your processor and pulse until it resembles this:
See the little pieces of butter in there?  So good!!  Set this aside.  If you don't have a food processor, you can use a fork and just mash the mixture until the butter pieces look like this.  It doesn't take very long at all.  You can even use your clean hands.  I've done that before when I didn't want to lug out the food processor and have to clean it.  It's fun!

Now take your ramekins and place on a baking sheet.  Spoon the blueberry mixture into the ramekins about 1/3 of the way up making sure the flour, sugar and cinnamon get evenly distributed in each ramekin.
Next, take your topping mixture and spoon plenty on top of the blueberries in each ramekin.  We like lots of topping around here.
Pop that into your 400 degree oven and bake for about 20 minutes or until the top is golden brown.  Those pieces of butter melt into the oats and brown sugar creating the best mouth watering crust ever!  That combined with the blueberries and the hint of cinnamon and the creamy vanilla ice cream melting on top of the warm crisp and it is heaven!  Try it!
Check back Monday for pics of my hubby's Father's Day gift!  I'm so excited about it!  He's gonna love it!  Wishing all you dads out there a super Happy Father's Day!  And even though my dad is no longer living, there isn't a single day that goes by that I don't smile remembering what a great dad he was to me.  I love you, Dad.