Sunday, April 29, 2012

A Vintage Map, A New Bed and Little Guy's Room Redo

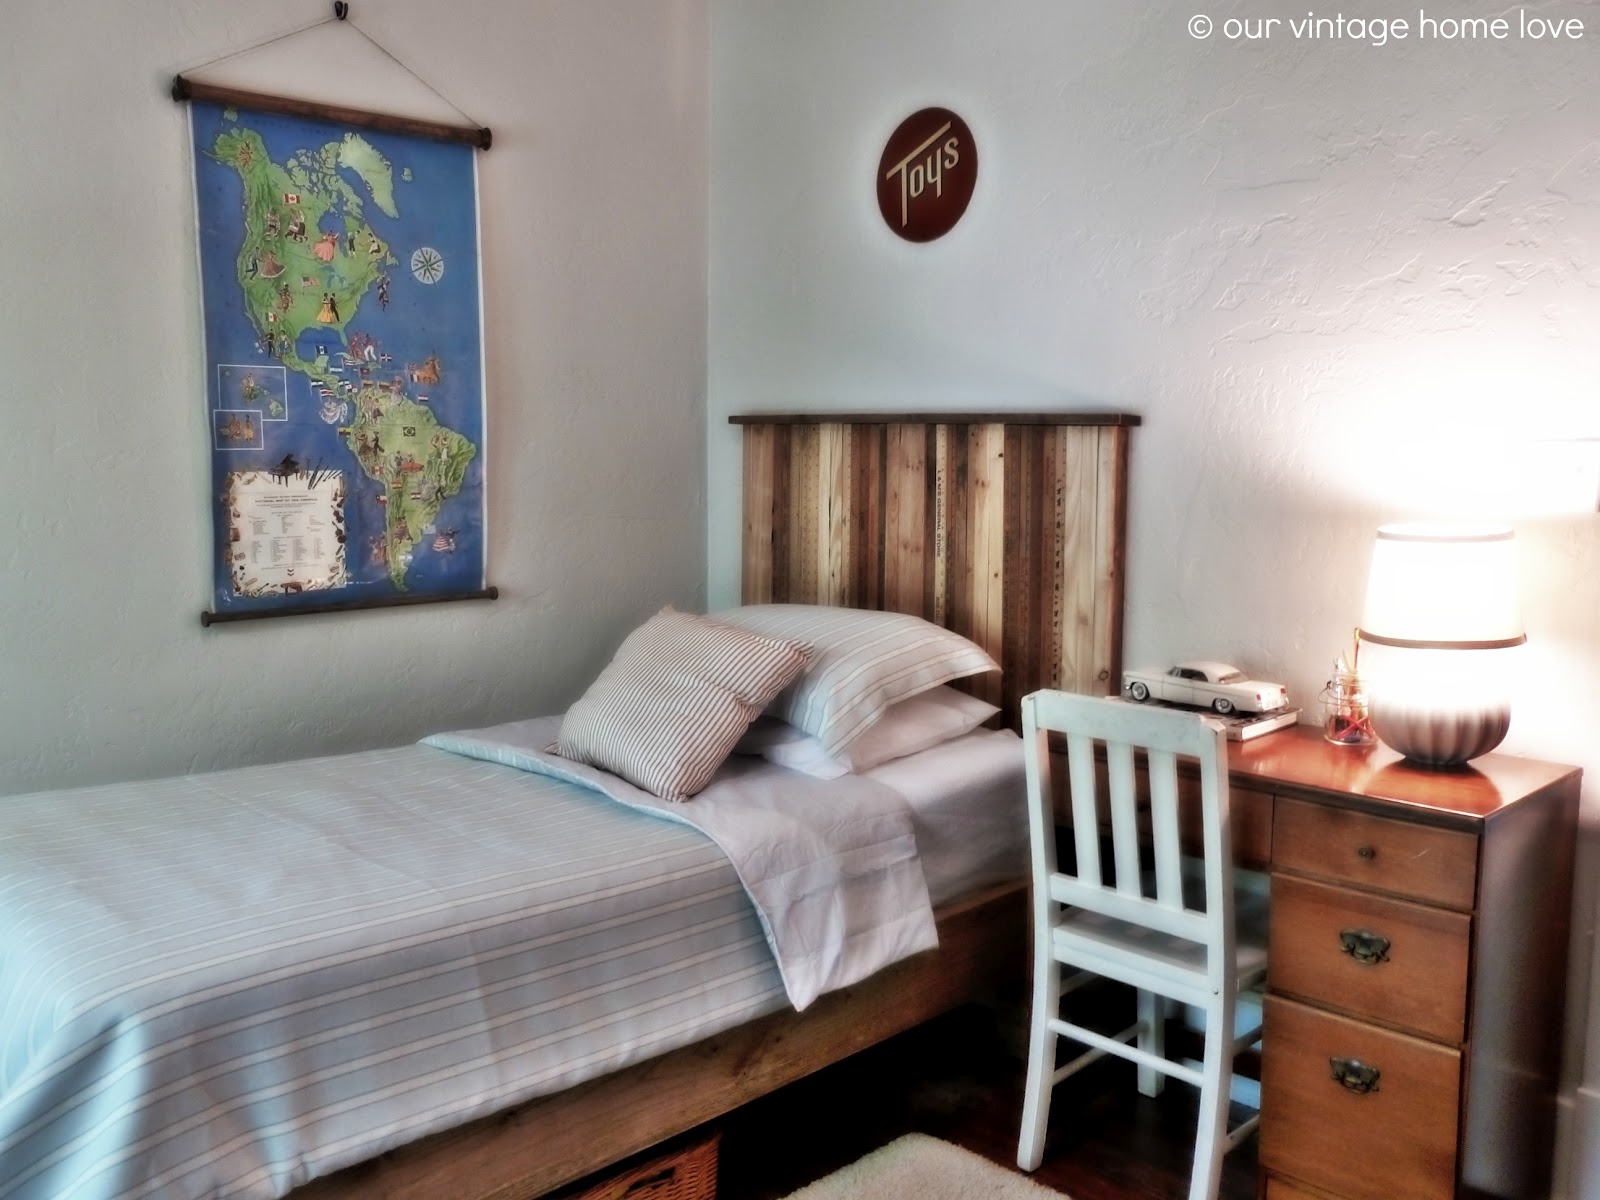
Hey there!  We are in the process of redoing our boys' rooms upstairs and this past week, I worked on several projects for little guy's room.  I was so happy with how they turned out, but it sure didn't start out that way.  I have a tendency to get in a hurry when working on projects, because usually I have other things to do like laundry, dinner, and being a mom and wife, so I get in a hurry and do things wrong only to have to go back and redo.  Not fun.   First up was this headboard I made for his room using our collection of vintage yardsticks.   
I started out by building a simple frame using 1 x 2's and attaching the yardsticks to the front of the frame.  Because I didn't want to use all yardsticks, I also used groups of lattice strips that I already had from a previous project.   

Originally, I stained those strips of lattice with Minwax special walnut stain.  But I didn't love it and it didn't look right.  So, after staring at it for a couple of days, I pried off the lattice strips and started over.  Luckily, I had plenty of those strips laying around.  Does anyone else ever do that?  Redo a project if it isn't just right?  Or do you just live with it?  

Redoing this project wasn't that much of a hassle, and I really did want it to look perfect for his room.  After they were all attached, I simply coated them with a clear water based polyurethane.  Then for the top, attached a 1 x 3 and that's it.  Here's a peek at it before I show you the rest of the room.  Total cost for this headboard?  Nothing!  We already had everything needed.  :)
The next project I worked on was a vintage map.  I am crazy for those old vintage pull down classroom maps.  But we don't happen to have $600 laying around to buy one.  Maybe I'm exaggerating a little but not much.  I've never been lucky enough to find one for below $300 so I did the next best thing.  Made one myself.  I had already purchased a fun vintage classroom map from Etsy for less than 20 bucks but it was just a regular ol' map.  Not the pull down variety so, I turned it into the pull down variety.  :)  

I started by completely coating the map with Mod Podge glue in glossy finish.  It gives the map a shiny, thick surface similar to the pull down kind.  Then I headed to Lowe's to pick up the supplies I needed.  Total cost for this project, not including the map, was less than 15 bucks.  I picked up a large round wood dowel rod that is used for hanging in closets.  Some vintage copper spray paint, a 3/4 inch wood dowel rod and two packages of white plastic closet rod sockets.  I cut the dowels to be about half an inch longer than the map on both sides and then stained them with Minwax special walnut stain.
Then I lined up the map with the dowels and attached industrial velcro strips to the dowel and the map.
I also used little dabs of hot glue.  I wanted to make sure it stuck to the dowel but also didn't tear the map.  Then I repeated that process with the smaller dowel for the bottom.  After that I took the plastic rod sockets and spray painted them with the vintage copper spray paint.
I attached those to the end of the top, larger dowel with hot glue and the screw included in the packet with the socket, leaving about 1/4 inch of it sticking out of the dowel.
Repeat with the other end.  Next I took hemp twine and tied it around the screw head also attaching to the other side.  This will be what you hang the map from on the wall.
I hadn't planned on putting anything on the bottom dowel but it didn't look right.  So, I cut two 1/4 inch pieces off the scrap of larger dowel I had from the previous step and spray painted both of them with vintage copper spray paint.
I hot glued those to the ends of the smaller dowel on the bottom of the map.
I absolutely love it!  Who needs a $300 pull down when you can make a faux one for 15 bucks?  And whenever we decide to store it, all we have to do is roll it up on the dowel rods instead of folding.  Here it is in the room.
The other major project I did in this room was make him a new bed out of those awesome 2 x 8's and a couple of reclaimed beams my hubby found.  Total cost for the bed?  15 bucks!!  Who knew you could make a bed for so cheap?!

I started by cleaning those beams hubby brought home.  Here's a pic of one of them before I sanded them down.
And after sanding.
Beautiful.   I cut them into four 12 inch pieces and coated them with Minwax Finishing Paste Wax in natural.  I love this stuff.
This next part was hard and I endured all kinds of injuries while doing it.  I measured the old bed frame, which was just one of those metal ones with wheels and cut my 2 x 8's to the appropriate length.  Then I attached them to each other to make a box, then attached the reclaimed 4 x 4 legs to the inside of the "box".  I also attached a couple of scrap 2 x 4's to the inside to also act as a brace for the box frame to sit on.  It would also be sitting on top of the 4 x 4's.  I kind of followed this tutorial.

This is definitely a project needing two people.  My hubby was at work so I tried doing it myself and had the thing fall on me a couple of times leaving me bruised and bloody, before enlisting the help of my older boys.  You definitely need heavy duty long screws to make sure it's secure and that takes two people to get them into the wood.  I figured this out after trying to hold the 40 pound boards myself while also trying to screw them together, missing and stabbing myself in the palm with the power screwdriver.  Good times.  And then after my two older guys carried it upstairs to little guy's room......guess what, it was too big.  So, after I cried a little, or maybe a lot, I took the darn thing apart in the bedroom cause there was no way we were carrying it back downstairs and outside.  I took the two end boards and cut 3 inches off them, brought them back upstairs and reattached everything.  Then it was a perfect fit.  Finally.  It. Was. Hard.  And a project I don't want to do again.  But oh how happy I was with the end result.
I used the same process for aging my dining room tabletop to age these boards to match the reclaimed wood of the legs.
Little guy was so excited and happy about his new bed so all this was totally worth it just seeing his happy face.  This new bed frame made his bed a little higher than the other one did, which he just loved.   I picked up this blue striped fabric at, of all places, Walmart, for $6 a yard and made a duvet cover for his previous bedspread.  I only had to purchase 3 yards for the front and I used a $5 flat sheet for the back, sewed them together, slipped the old bedspread inside and voila.  A new bedspread.
I repainted his walls, which were previously light blue, a color called Classic Gray by Benjamin Moore.  I liked it so much that I'm now painting our dining room the same color.
I'm actually not finished with the other side of the room yet, so that will come in another post.
I attached the headboard to the wall, not the bed.  I am so crazy about his sweet little room.  And more importantly, he is crazy about it, too!
The pillow on the left in the photo above is fabric that is also from Walmart.  It is orange and perfect.  The perfect thickness and only 2 bucks a yard.  Plus, it reminded me of baseball stitching so I just had to get it.  I actually bought the entire bolt of it.


Have a great day!

Diana

Friday, April 27, 2012

Flower power in the family...


Dear readers,
After days and days of endless rain, I think a blog post filled with floral delights is in order...


... so today I invite you to take a stroll with me through the lovely garden of my sister-in-law.


This tranquil and inviting floral haven is in Oxfordshire, and the other day when we "popped in" for a cup of tea, I declined my cup (I know, I know, terribly un-English of me!) and asked if my camera and I could instead explore her beautiful garden...


As you may see in some of the photos, we had a few - and oh so cherished - minutes of sunshine, before the heavens opened again and emptied what seemed like every rain cloud in the county...


This is a wonderful "come-and-explore-me" garden. Even from inside the house you are drawn to the circular gravelled path at the other end of the garden. Where might it take me? What secrets lie beyond?

And you will not be disappointed. A small pond, surrounded by marvellously  mossy stones, and an old wooden bench, whispering "Come hither, sit down, why don't you? Together we can contemplate life for a moment..."


But I did not listen to the bench this time. There were simply too many flowers beckoning me, tilting their little petal heads to look pretty for the camera. So I listened to them instead...


... and said hello to a thousand little forget-me-nots, all enjoying the company of wonderful light-green foilage friends and pretty purple neighbours.


Thank you, Eve, for letting me explore your little piece of paradise!


Wishing you all a wonderful, flower-powered weekend!

Helena

***

Update: Since I published this blog post, I have learned that in addition to my sister-in-law's own ideas and wonderful work with her garden, she also had some help from Andrew, a garden designer with the lovely  company name Go Wild Landscapes. If you live anywhere in Oxfordshire, Gloucestershire or Bucks., like what you see in this blog post and need a little help creating your dream garden, they are the ones to call! (Clicking on their company name above will take you to their website).

***

Monday, April 23, 2012

Back/Side Porch Ideas For Summer and An Industrial Pipe Curtain Rod How To

Hey there!  When we first found our home 6 years ago, I was absolutely in love with this side porch off the kitchen.  At the time of course, it looked awful because it was in the middle of being renovated, but, I saw what it could be.  I pictured pots of delicious herbs just waiting to be harvested for cooking, a cozy table to enjoy lunch or a morning cup of tea or coffee, or just a place to sit and read.  Funny thing was, it wasn't until now, 6 years later, that I finally filled the porch with those things.  I have no idea why.

We have a large vegetable garden in our backyard, complete with herbs, so, it never occurred to me to also have some on the porch.  My hubby came home the other day with a crate that he found beside the road that I just loved.  I had it sitting on the porch for a few days waiting until I decided what to do with it when I realized how much I loved it on the porch.  And an idea was born; fill it with unique herbs that I don't have in my vegetable garden, but that I would like to experiment with in the kitchen.
I like to keep the decor on this porch simple, so, here's what I did.
Last year when I made these porch curtains, I just hung them with rope instead of going to the trouble of installing a rod, very rustic and easy.  This year, after seeing industrial copper pipe curtain rods everywhere, I just had to try making some, so, I went to Lowe's and priced copper.  Uh....yeah, way too expensive.  So I stood in Lowe's for an hour trying to come up with a cheaper way.  Total cost, $25 for two 4 feet long rods.  Here's what I came up with.
 I used PVC pipe and spray painted it with the best metallic copper spray paint.  The quick tutorial will be at the end of this post.
I love how they turned out!  It's like a little surprise inside the porch.
Here's the crate my hubby found.
I filled it with italian parsley, purple basil, chamomile, dill and cinnamon basil.
The hand carved oar is vintage and was found by hubby.
I painted these stripes on our back porch last summer.  They match our front porch, as well.
Hubby also found this metal garden planter.  I didn't care for the brown color, so, I spray painted it with the extra copper spray paint.  The vintage faucet towel rack I made a couple months ago, click here for the tutorial.  It will be the perfect thing to hold my kiddos wet towels this summer from swimming, instead of piling them on the floor.  And is the perfect pop of color.
 And that's it for the back porch!
Best thing is it's exactly like I pictured it 6 years ago. :)  Finally....

Here's what you need to make the pvc pipe curtain rods.
Everything was found in the plumbing department at Lowe's, except the spray paint.  It's important to note that if you make your rod any longer than about 3 - 4 feet like mine, you will need a middle support as they will droop a little from the weight of your curtains.

I started by cutting the pvc pipe to size and then cutting four 1 inch pieces to use to connect the elbows to the adapter.   Then connect the elbow to the pipe.
Next, connect your 1 inch piece of pipe.
Take your adapter/connector and flange......
Screw the connector into the 1/2 inch flange.
Then connect it to the elbow and pipe.
 And that's it!  Spray paint next!
Make sure that when you spray paint, you spray light coats, keeping the nozzle at least 12 inches from the rod, or the paint will run.  Let dry completely between coats.  I painted 3-4 coats.  Then attach with screws through the flanges.  I don't know the exact terms for these parts, so I hope this is helpful.  I should also mention that I had a nice Lowe's sales person help me find the right parts after I told him what I had in mind.  That helps a lot!
See how nice the spray paint goes on, even though it's plastic?  Perfect!  And so much cheaper than real copper!  As always, if you have questions, feel free to ask in the comments below or shoot me an email! 

Note:  After your rod is painted and complete but BEFORE you hang it, you can easily pull off the end to slide on your curtains.  Then reattach the end and hang.  Be sure to do this before you attach them to your wall or you won't have a way to put your curtains on the rod.

I've got so many fun projects going and I can't wait to blog about them all!  And I'm still working on those tutorials, as promised!

Have a great day!
Diana